Product Overview
This product will enable a tool in Sugar that will help users verify email addresses by leveraging the powerful hunter.io verification system. This will prevent developing a bad IP reputation over time, ensuring you are only targeting verified email addresses.
Installation Guide
Prerequisites
This product must be purchased via Sugashop. Check first that the product is compatible with your version of Sugar by looking up the Supported Versions information. To find out what your Sugar version is, navigate in your Sugar instance to the ‘About’ page in the top right-hand corner.
To use Hunter Email Verifier, a subscription plan with hunter.io is required. This can be either the free plan or one of the paid-for subscription plans.
You need to have full Sugar System Administration access to complete the setup of this product in Sugar.
You need hunter.io account access to connect Hunter to your Sugar instance.
Product Download
- After purchasing, download the .zip file of the installable custom package. This file can be found either
- after purchase on the Sugashop Order Received page.
- via the Confirmation Email sent to the Sugashop accounts’ email address.
- via ‘My Account’ in the Sugashops’ Downloads page.
- There may be more than one downloadable .zip file as we support different Sugar versions. When downloading, select the file that is compatible with your Sugar version.
- Ensure the zip file has not been unzipped by your browser after downloading.
Product Installation
Prior to package installation, it is best practice to ensure that you have a fresh backup of your Sugar instance. Although this is not required, it is recommended whenever installing new extensions to your application.
Caution: As with any package installation, this will cause a system refresh and data being processed may be interrupted. We recommend you complete the installation at a time with low system usage.
If you are installing an updated version of your existing Sugashop product, ensure that any previously installed version of the package is uninstalled before installing an updated version in your Sugar instance. Please see the Uninstallation Guide for more information.
Steps:
- Log into your Sugar instance as a System Administration user.
- Navigate to the “Admin” page and access Module Loader.
- Upload the installable .zip file by clicking on ‘Choose file’. Once the file has been selected, click on the ‘Upload’ button.
- Once the file is uploaded, click the ‘Install’ button.
- Select Commit to start the installation.
Note: This may take a few minutes. - Sugar will redirect you to Module Loader after installation where you should now see your uploaded product in the list of installed packages.
Note: Be patient and wait for all “Loading” messages to disappear. - Now the package is installed, it is best practice to perform a Quick Repair & Rebuild. Navigate to Admin > Repair, then select “Quick Repair & Rebuild”.
Note: The Quick Repair & Rebuild process may take a few minutes.
If during the Installation of the Sugashop product you experience any unexpected behaviour, run the Rebuild JS Grouping Files and Clear Additional Cache.
Steps to Rebuild JS Grouping Files:
- Navigate to the “Admin” page and access Repair.
- Select Rebuild JS Grouping Files.
Steps to Clear Additional Cache:
- Navigate to the “Admin” page and access Repair.
- Select Clear Additional Cache.
Sugashop License Validation
Navigate to: Admin > Sugashop™ by Sugabyte – License Management > Select ‘Manage Licenses’.
Enter the License Key provided to you on purchase of the package. You can retrieve your license key from:
- the Order Received page when processing an order from Sugashop.
- via the Confirmation Email sent to the Sugashop accounts’ email address.
- via ‘My Account’ in the Sugashops’ License keys page.
Enter your license key into the App License Key field then click on the Verify License button.
Hunter.io Subscription API Key Validation
You will require a Hunter subscription in order for this customisation to work. There are a variety of plans available including a free plan. Navigate to Hunter.io and log in or click on the Sign up button to register your account if you don’t already have one.
Retrieve your Hunter.io API Key
Once registered and logged into Hunter.io, navigate to your account (top right) > click on ‘API’ > Copy the API Key.
Save your API Key into Sugar
In Sugar, navigate to: Admin > Sugashop™ by Sugabyte – Hunter Email Verifier for SugarCRM, and select: Hunter Email Verifier Settings.
Note: If you don’t see this page, try a full browser refresh.
Paste your API key into the box provided and click on Save.
Setting up the Hunter fields in Studio
This customisation will automatically create some new fields in the Accounts, Contacts, Leads and Targets module. They are added to the database and are available in Studio, but they are not added to the layout just yet.
Note: All Hunter fields are editable for all users by default. If you wish to restrict user access to these fields, you can do this by using Sugars’ Role Management. Please follow SugarCRMs’ official guide on role management.
New Fields
| Field Name | Field Label | Description |
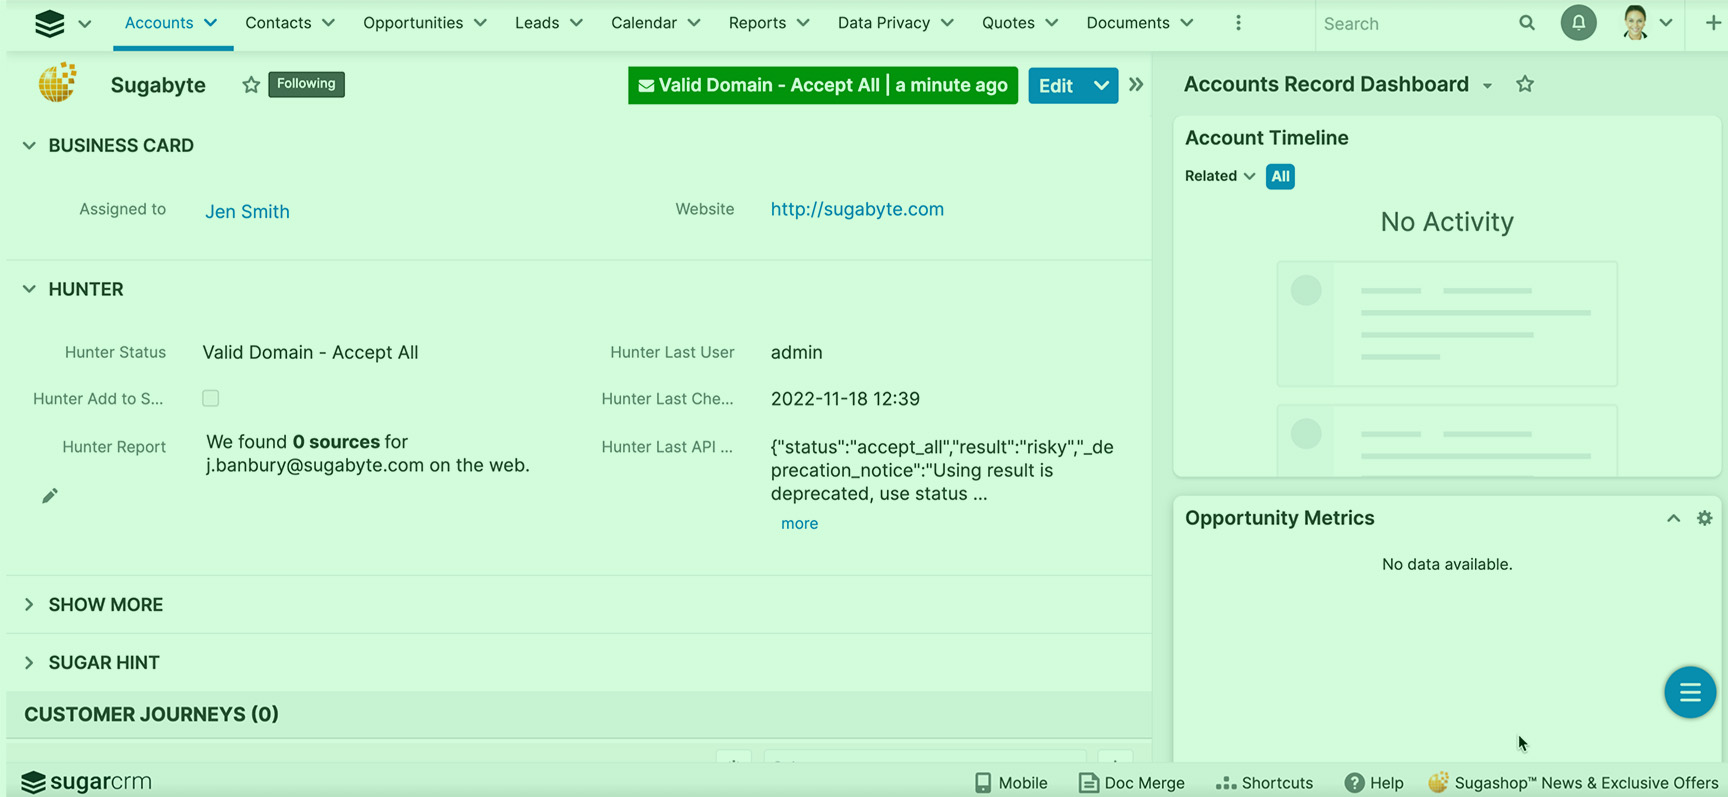
| hunter_status_c | Hunter Status | This dropdown field will display the current status of an Account/Contact/Lead/Target that has been verified. |
| hunter_last_checked_c | Hunter Last Checked | This Date/Time field will display the last time an attempt has been made to verify the email address. |
| hunter_last_api_details_c | Hunter Report | This field will display the results of various web locations the email has been detected by the Hunter verification service. |
| hunter_last_api_c | Hunter Last API Call | This is a TextArea field which displays the complete API response from the Hunter service. This field is useful for power users or system administrators to report on key words returned from Hunter. |
| hunter_last_user_c | Hunter Last User | This TextField displays the username of the last Sugar user who performed the most recent email verification. |
| hunter_set_scheduler_c | Hunter Add to Scheduler | This checkbox is used when wanting to leverage the Scheduled Job to perform mass email verifications at once. |
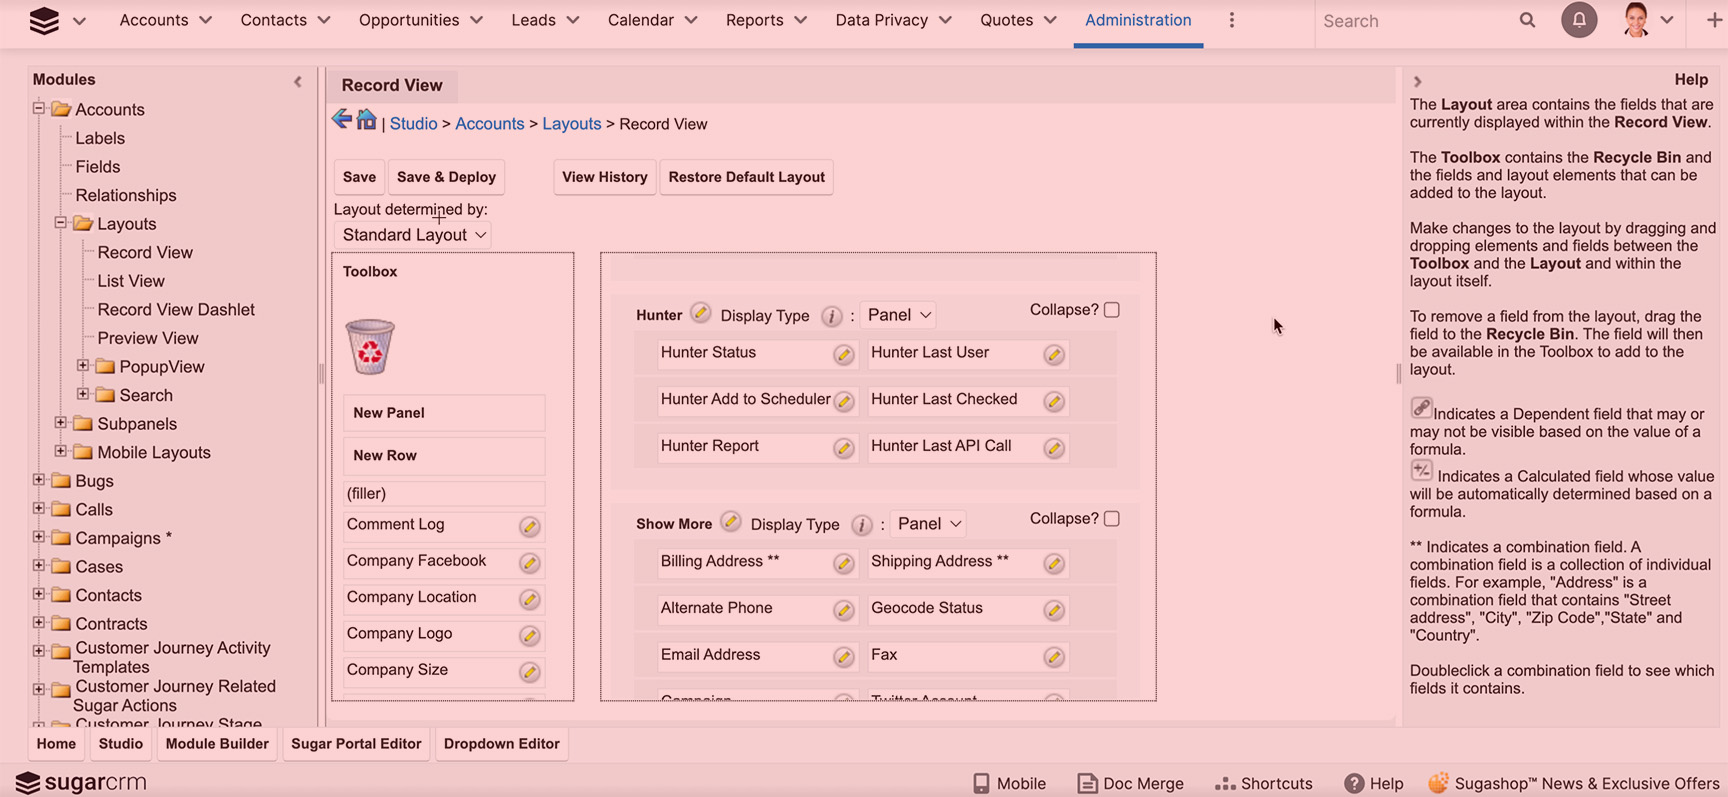
Configure the layouts in Studio
We are assuming that you are familiar with the Studio tool in Sugar to configure the layouts.
We would advise that you create a separate panel or tab for the Record View in each of the modules that you want to use this tool with.
In order for the Hunter Verifier to work as expected, the fields “Hunter Status” and “Hunter Last Checked” must be added to the Record View Layouts.
Here is an example (use the slider):
Configure the Scheduler
If you wish to use a Scheduled Job to mass-update multiple records to be verified, you’ll need to do two things:
- Create the Scheduler.
- Update the field settings in Studio for the Hunter Add to Scheduler checkbox field.
Create the Scheduler
- Navigate to: Admin > Scheduler.
- Click on the dropdown arrow from the main menu bar (where it shows Sugar Scheduler) and select Create Scheduler.
- Give the scheduler a name in the Job Name field (for example: “Hunter Email Verifier”).
- In the Job dropdown, select Hunter Email Verifier Scheduler.
- Ensure the Status = Active.
- Select the Interval. This determines how often this job will run. We would recommend every 10 minutes.
- Click Save.

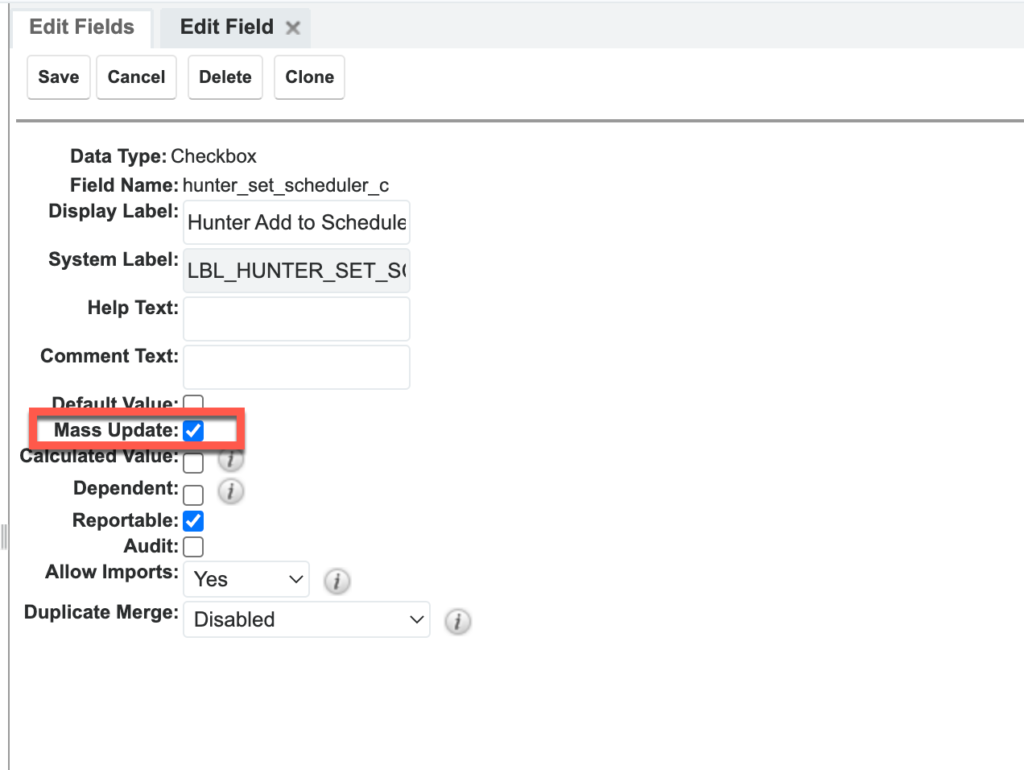
Update the field setting in Studio for Hunter Add to Scheduler
To make best use of the scheduled job, you should enable the ‘Hunter Add to Scheduler’ field for mass updates. For this,
- Navigate to Admin > Studio.
- Open the Module that the field sits in (Accounts, Contacts, Leads, Targets).
- Select Fields and locate the Hunter Add to Scheduler checkbox field.
- Select the checkbox for Mass Update and Save.
Uninstallation Guide
You may need to uninstall the existing version of your Sugashop product due to there being an updated package release or because your subscription has ended.
In the event that the package needs to be uninstalled from your Sugar instance(s), follow the below listed steps.
Caution: As with any package uninstallation, this will cause a system refresh and data being processed may be interrupted. We recommend you complete the uninstall at a time with low system usage.
Please Note: On package uninstall the Hunter fields and all captured data will remain available in your Sugar instance. This will allow for re-install of the Hunter Verifier (for example to install an updated package version) without losing data or changes to your layouts. In between uninstall and re-install, the fields will temporarily show with the label “LBL_ XXX” which will be restored on re-install.
Uninstallation Steps
- Log into your Sugar instance as a System Administration user.
- Navigate to the “Admin” page and access Module Loader.
- Locate the installed extension by searching for the product name.
- Once you have located the extension, click the ‘Uninstall’ button.
- Select Commit to start the uninstallation.
Note: This may take a few minutes. - Sugar will confirm the successful uninstall. Click the “Back to Module Loader” button.
Note: Be patient and wait for all “Loading” messages to disappear. - Now the package is uninstalled, it is best practice to perform a Quick Repair & Rebuild.
- Navigate to Admin > Repair, then select “Quick Repair & Rebuild”.
Note: The Quick Repair & Rebuild process may take a few minutes.
- Navigate to Admin > Repair, then select “Quick Repair & Rebuild”.
If the Hunter Email Verifier is no longer needed, but you wish to keep the historical Hunter data, then the Hunter fields can be hidden from all layouts via Studio (the data will remain available).
Alternatively, if the Hunter related data is no longer required, the Hunter fields can be deleted and the data removed with it via Studio.
It is recommended to take exports of the data prior to field deletion.
This concludes the installation, set-up and uninstallation guide. For the end-user guide, please follow: